The wait is over! Palworld is out there in the Gaming world. This game can be easily played on Xbox, PC, and Steam. Palworld created a sensation in the gaming world as soon as its Steam version was released on January 19, 2024. Within 8 hours of its release, more than a million copies had been sold.
Good news for PC or Steam users who want to play Palworld with more than 4 players in an adventurous multiplayer battle – they now have the option to set up their dedicated server and enjoy Palworld with up to 32 players.
In this tutorial, today we will guide you on two ways to set up a Palworld dedicated server:
- The first method involves creating a Palworld dedicated server through a third-party VPS hosting server.
- The second method is for those who want to transform their own PC into a VPS server.

What is the Palworld Game?
Palworld is an upcoming game that mixes action, adventure, survival, and monster-taming. Developed and published by the Japanese company Pocket Pair, it features an open world filled with cute animal-like creatures called “Pals.” Players can battle and capture these Pals to use them for building bases, getting around, and fighting.
People are claiming that it is 10 times better than Pokemon.
In this game, you can choose to live peacefully with Pals or take risks to protect them from poachers. Pals can be used for different things like fighting, working on farms or factories, and you can even sell them or eat them!
Survival is a big part of Palworld, with a tough environment where food is scarce, and dangerous poachers are always a threat. To survive, you have to be careful and make tough choices, like deciding to eat your own Pals when you need to.
Palworld also lets you ride on your Pals to explore the land, sea, and sky, making it easier to travel and discover new places. The game brings together various elements, creating a fun and engaging experience where your decisions shape the story in a world full of possibilities.
The Need For Making a Own Palworld Dedicated Server?
Creating your own Palworld Dedicated Server opens up a world of possibilities beyond the basic online steam version or Xbox version.
Here’s why making your dedicated server is a game-changer:
1. Play with More People:
While the basic game lets you play with up to 4 friends, a dedicated server lets you play with up to 32. It’s like having a big gaming party.
2. More Fun with Mods:
Setting up your dedicated server allows you to add cool mods, making the game more exciting and unique.
3. Less Lag:
Dedicated servers result in reduced lag for players, offering better responsiveness and a more enjoyable gaming experience.
4. Pick Your Challenge:
On your dedicated server, you can choose how hard or easy you want the game to be. It’s all up to you.
5. Play with Friends:
Hosting your dedicated server means you can play with your friends only. It’s like having your own private gaming space.
6. Make Your Game Stronger:
On your server, you can make your in-game pals stronger and get more stuff. It’s like customizing your game the way you like.
7. Control Day and Night:
With your dedicated server, you can decide when it’s day or night in the game. It adds a bit of strategy to how you play.
8. Grow Your Palworld Community:
Having your Palworld server means more people might join you. Friends, fans, and other gamers can be part of your gaming world. You can even stream your Gameplay on YT and build a huge fan base.
What are the Best Ways to Setup an Own Dedicated Server for Palworld?
What Do You Need to Set Up a Palworld Server?
First and foremost, an internet connection is essential. Additionally, you must decide whether to opt for a dedicated VPS game hosting service or host it on your personal computer.
If you choose a VPS host, you’ll need the extra funds to buy and sustain the servers. On the other hand, if you’re hosting it on your PC, make sure you have the Palworld steam version installed and some basic command line skills.
Keep reading… The process to set up a dedicated server is about to start.
How Can I Host My Own Palworld Dedicated Server?
Have you understood how crucial it can be to create a dedicated server for Palworld?
Let’s explore both methods.
#1 Method: Run Through Third Party VPS Game Hosting Service
Quick Note: This approach is strongly recommended for those who want to set up their Palworld dedicated server quickly, within 10 minutes, without dealing with technical configurations.
If you are new to VPS, let me tell you in short…
A Virtual Private Server (VPS) game hosting is a service which offers dedicated spaces just for Palworld games. Unlike regular hosting for websites, these special services focus on making your gaming experience fantastic. They make sure the game runs smoothly, stays online, has cool features, supports mods, and keeps your progress safe with easy backups.
Many providers are offering Palword VPS services for a price like $30-$35/month. Now choosing the best Palworld VPS hosting is a tough task.
But don’t worry! We’ve researched every best option to make your life easier.
Our recommendation is to opt for Hostinger Palworld Hosting service, starting at just $5.99 per month. We have even ranked Hostinger as the top choice for the best Minecraft server hosting.
Why Hostinger?
- Providing a Game Panel which simplifies Palworld server creation, eliminating the need for complex Linux commands.
- Affordable plans – Starts from just $5.99/month
- Offering a VPS AI Assistant for troubleshooting, solving configuration issues, and generating commands.
- Highly stable servers, giving a guarantee of 99.9% Uptime
- Full Root Access
- Mod Support
- Customized Gameplay
- High reliability because of AMD EPYC processors, NVMe SSD Storage, and DDoS protection.
Why Choose VPS Game Hosting Approach Instead of Building a Server on Your Own PC?
- 24/7 Availability: Cloud servers ensure constant availability without keeping your personal computer running.
- Improved Performance: Dedicated resources in cloud hosting prevent slowdowns caused by other applications on your computer.
- Low Latency: Cloud-hosted servers provide a superior gaming experience with low latency on premium networks.
- Reduced Cost: Cloud servers are more cost-effective than running a personal computer 24/7, considering power consumption and other costs.
- Professional Support: Online hosting services offer 24/7 support for quick issue resolution compared to self-hosted servers.
#2 Method: Host Through Own PC
Building a Palworld dedicated server on your own PC has fewer benefits but more problems. But we know choice is choice!
Well, Go ahead with this PC method only if:
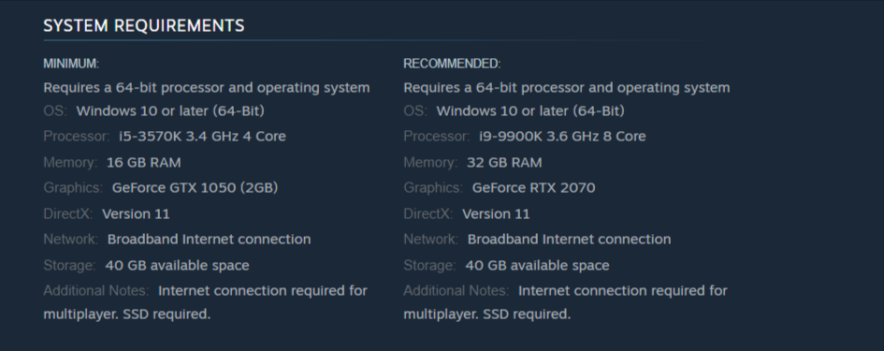
- You already have a gaming pc which can handle Palworld steam version system requirements.
- You are ready to run it 24*7*365
- You don’t want to invest every month for a Palworld Hosting charge
- You have enough knowledge of CMD/Linux commands

It’s time for a live demonstration.
How to Create a Palworld Dedicated Server Through Hostinger [10 Minute Process]
Prerequisites:
- Powerful PC with at least 16 GB Ram & 2 GB Graphic Card (GTX 1050)
- OS: Windows / Linux
- Storage of more than 40 GB SSD
- Hostinger Palword Hosting Server Plan
Step 1: Purchase a VPS Plan
Click here to navigate to the Hostinger Palworld official page. It is important to use this link, otherwise you will miss the additional discount coupon. The Normal rates are high, starts from $6.99/mo
As soon as you click it, you will see the 3 Palworld hosting plans on which the discount coupon would be automatically applied.


Hostinger offers 3 plans for Palworld servers (starts from $5.39/mo). As per Steam official Palworld page, the minimum ram required to play this game on a best performance is 16 GB.
Hence, the Game Panel 4 plan of Hostinger would be an ideal choice. However if you have budget issues, You can go with the Game Panel 2 plan. Below this, we do not recommend any plan as it will create a lagging problem.
Once you tap on the “Add to cart” button, you have a checkout screen. Here grab the 24 months tenure as it offers maximum savings. Make the payment and you are good to go.
Step 2: Setup a Hostinger VPS Server for Palworld
As soon as you are done with the payment, you will be redirected to this screen. Please tap on the “Start Now” button to proceed to the VPS Game server.


Now you have to configure few things such as:
- Location for new VPS (Please choose closest)
- Set your VPS password
- Set your VPS username
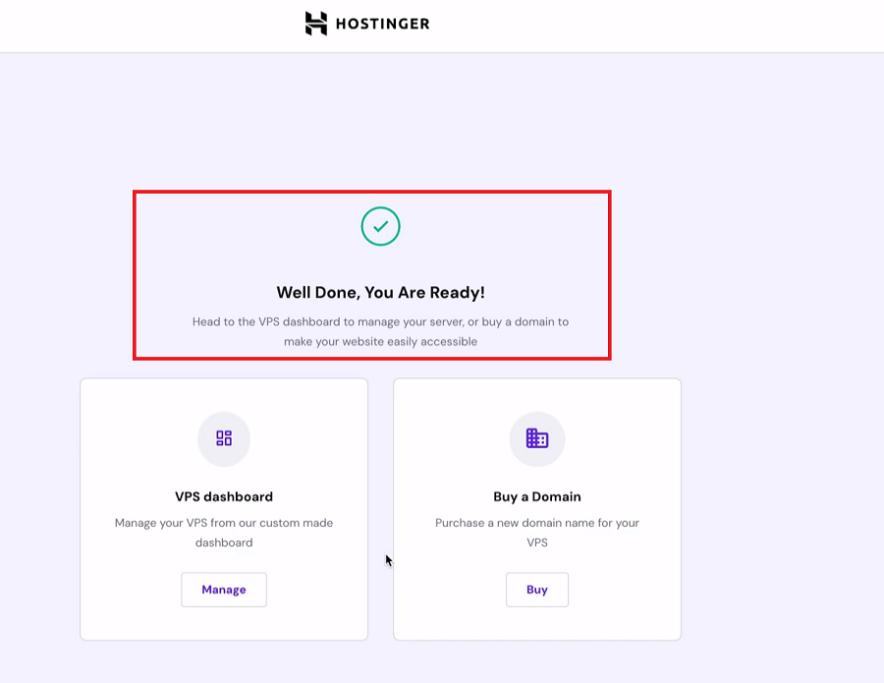
Once you finish the VPS setup successfully, you will see this screen:

Step 3: Accessing a Game Panel
Before creating a dedicated server for Palworld, first you need to access the Hostinger Game Panel.
To do this, first tap on the Manage button placed showing in a previous step.
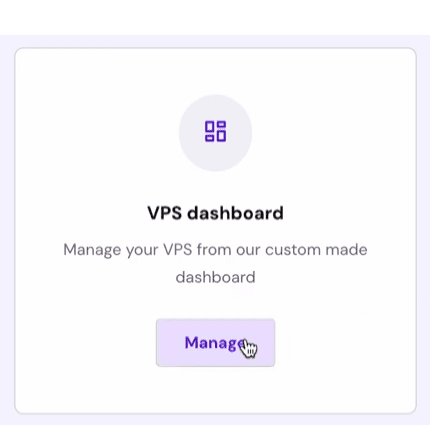

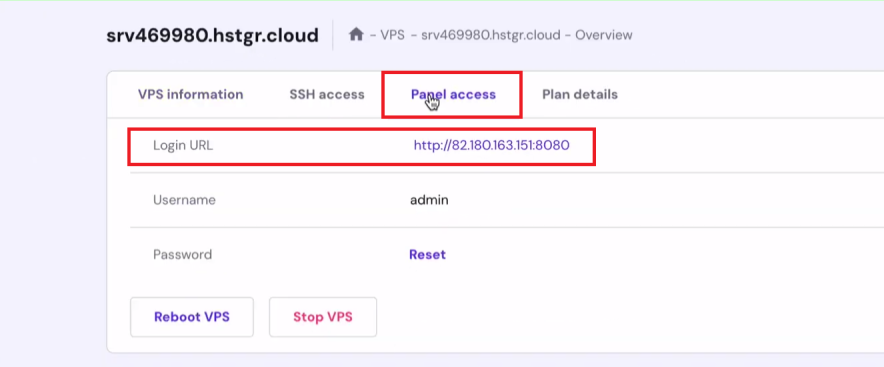
Under VPS dashboard, Navigate to the Panel Access and here you need to tap on the Login URL.

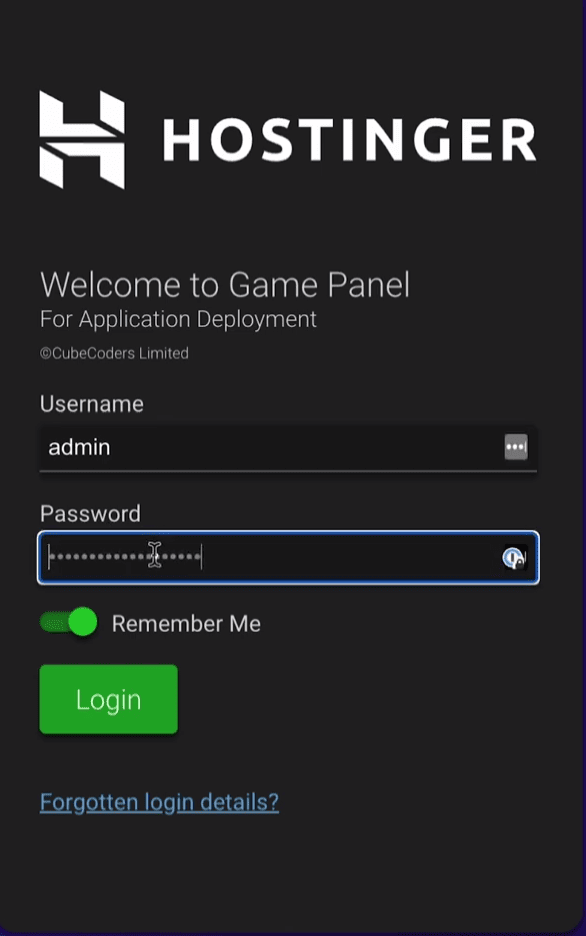
Now you are redirecting to a Game Panel. To login, please use the credentials you have configured in step 2.

Step 4: Build a Palworld Dedicated Server
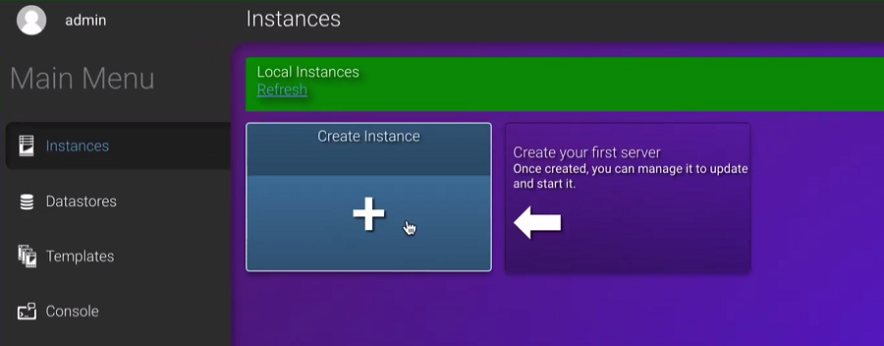
Inside the Game Panel, First you have to create an Instance. To do this, tap on the “Create Instance” button.

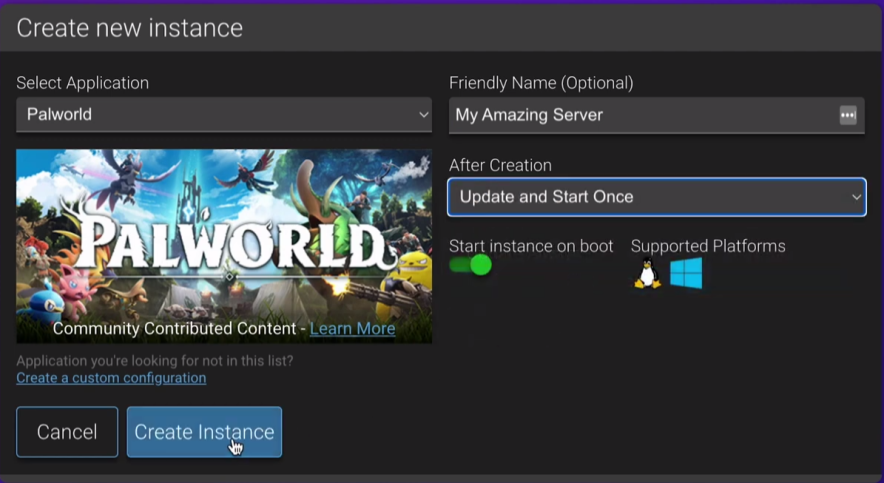
Then you have to configure a instance:
- Select Application: Choose Palworld here
- Friendly Name: Give any
- After Creation: Please choose “Update and Start Once”

Congrats! Your Palworld server has been created. Now only the configuration part is left.
Step 5: Configure a Palworld Server
To proceed with the configuration, Select a Palworld Instance, and from the left, Tap on the manage button.
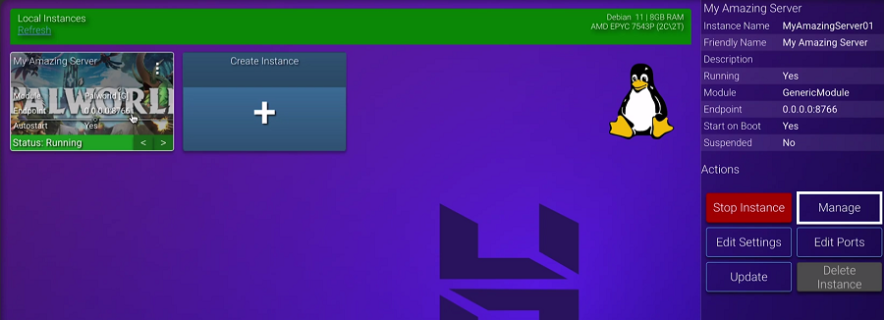

In the new open window, Navigate to the Configuration Tab > Palworld Server Settings
Here you can customize the settings like:
- Server Name
- Community Server Toggle On & Off
- Server Password
- Player Limit
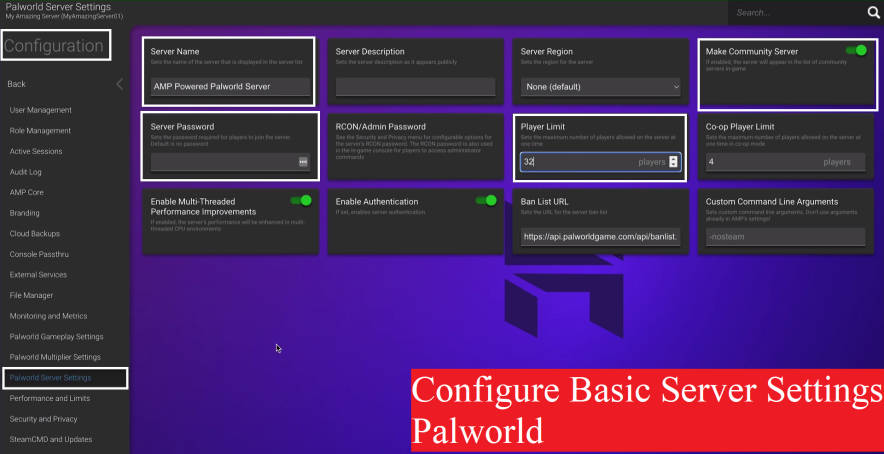

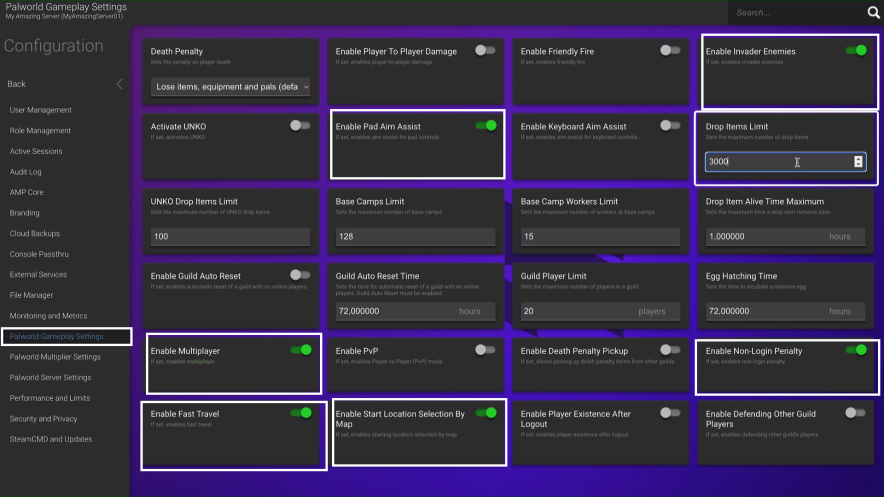
Once you finish those settings, move to the Palworld Gameplay Settings.
Here you can change the settings the way the Game is played on your server. In simple terms, these settings are specifically for changing the rules of the Game.

Similarly, you can configure the Palworld Multiplayer settings:
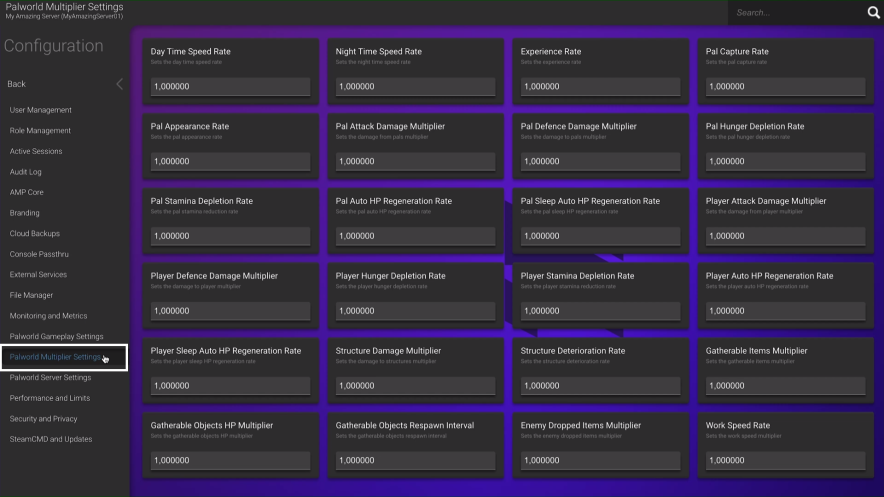

Leave this as it is if you aren’t sure of your changes.
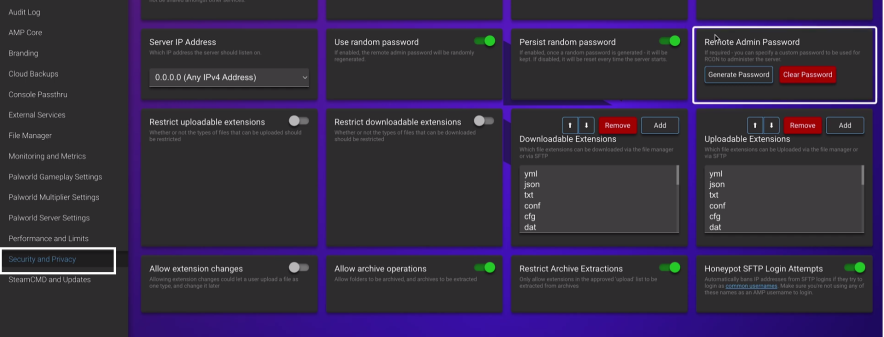
Next, you need to generate your remote admin password. (This helps you joining your Palworld dedicated server as a admin)
To get admin password, Navigate to the Security and Privacy tab > Remote Admin Password and tap on the Generate password button. Please copy paste this generated password as you are required to login in the game.

Step 6: Launch the Palworld & Connect to the Server
Now to proceed after, I would advise you to watch the below video from 04:27 Minutes. It will show you:
- Where you have to enter a IP
- How to login as an admin through a special command
- List of useful commands
- More
How to Build a Palworld Dedicated Server on Your Own PC
Prerequisites:
- OS: Windows or Linux
- Fast Internet Connection
- More than 40 GB ssd Space
- 16 GB RAM – 32 GB RAM
- Graphic Card (GTX 1050 or higher)
- Palworld Game (Buy on Steam)
Step 1: Download Palworld Dedicated Server (on Steam)
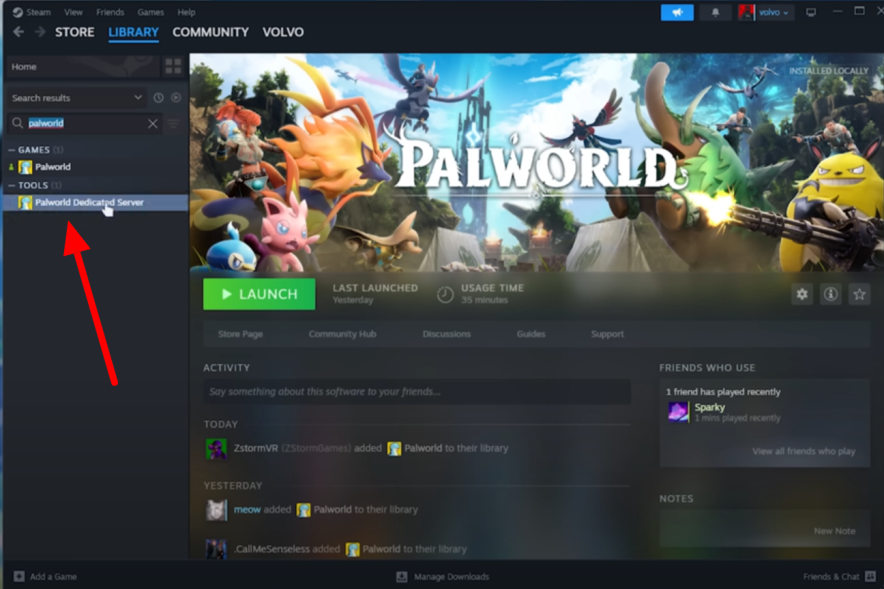
Login to your Steam client version, Search for Palworld inside the library tab. You will see the “Palworld dedicated server folder”. Download and install it on your PC.

Step 2: Open Palworld Server Files on a PC
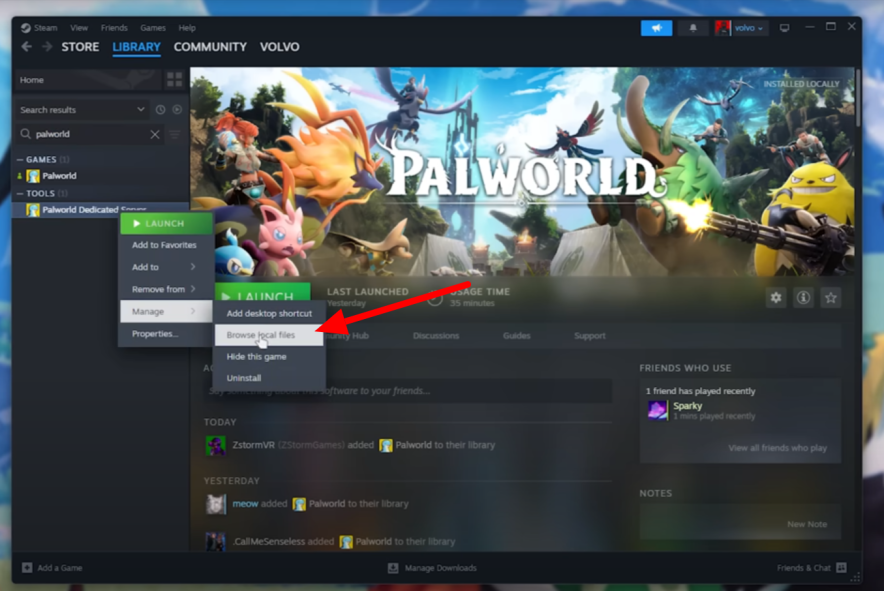
Once you downloaded the game, Simply right click on the Palworld dedicated server and choose Manage > Browse Local Files.
This will navigate you to the Palworld server files folder stored on your local PC.

Step 3: Configuring a Server
Configuration steps includes:
- Install SteamCMD
- Logging into your router admin
- Forwarding the port to 8211
- Discovering your IPv4 address
- Sharing it with friends for connection.
- More
Setting up a server requires multiple steps, and it’s recommended to watch the tutorial video below for a clear understanding of the entire process.
FAQs
What platforms can I play Palworld on?
Palworld is available for Xbox, PC, and Steam platforms.
How many players can I enjoy with Palworld on a dedicated server?
You can host a dedicated Palworld server with up to 32 players, providing an adventurous multiplayer experience.
Why is setting up a Palworld dedicated server through third party hosting recommended?
Creating a dedicated server offers benefits such as quick setup (within 10 minutes), no need for technical knowledge, and a smoother gaming experience.
Can I play Palworld on my own PC without a dedicated server?
Yes, you can play Palworld on your personal computer without a dedicated server. This can be done by installing a Steam Client and buying a Palworld on a Steam version.
How does hosting a dedicated server impact Palworld gameplay?
Hosting your dedicated server allows playing with more people (up to 32), adding exciting mods, reducing lag, customizing gameplay, controlling day and night cycles, and growing your Palworld community.
What are the prerequisites for hosting a dedicated server?
You need a powerful PC with at least 16 GB RAM, a 2 GB graphic card (GTX 1050), and a Palworld Hosting server plan.
Can I set up a dedicated server for Palworld on Xbox?
Sadly, Xbox users can’t make a dedicated Palworld server right now, but things might change later on.
How much does a Palworld dedicated server cost?
The cost of a dedicated Palworld server varies, but hosting services like Hostinger offer plans starting at $5.99 per month. Prices may differ across providers, so it’s advisable to explore different options based on your budget and gaming needs.
Finishing Up
In Palworld, where you can befriend cute creatures or face challenges from poachers, setting up a special server adds more fun.
We suggest going with hosting servers to set up your dedicated Palworld server instead of doing it on your own PC. It’s easier, faster, and avoids the technical stuff. This way, you can just enjoy playing Palworld and building your gaming community without any extra hassle.
If you have any questions, please comment below. We will help you for sure.
We get a commission when you buy a product via our affiliate link at no additional cost.